Native-Art-in-Canada has affiliate relationships with some businesses and may receive a commission if readers choose to make a purchase.
- Home
- Build a Birchbark Canoe
Building a Birchbark Canoe
Your Own Birchbark Canoe Might Be Possible
I'm going to tell you a little bit about how to build a birchbark canoe, but first of all I'm going to tell you about the first time I was involved in making one.
One summer, a long time ago, I watched my grandmother show my parents how to make a canoe from a birch tree. My grandfather had died the previous winter, and looking back, I think Kokum realized that she'd better get a move on if she was ever going to pass on all the tricks of her trade.
She made the announcement one Spring evening after watching a huge flock of geese fly over our canvas covered cedar strip canoes and land noisily near the point of reeds that sheltered the bay.
Without consultation she said, "It's time to get some birch bark. We're going to make a canoe. We'll start tomorrow."
Choose the Tree for Your Birchbark Canoe
So next morning my mother packed a lunch, then armed with a bow saw, an axe, a hatchet and the inevitable hunting knives we set off looking for a birch tree that would provide us with a single piece of birch bark about sixteen to twenty feet long and about three or four feet wide.
Nowadays finding the tree is the hardest part of making a canoe! Useable canoes can be made from a selection of smaller pieces of birch bark by lacing them together with strips of spruce root and sealing with spruce gum, but the result is never quite as strong because more seams increase the possibility of more leaks.
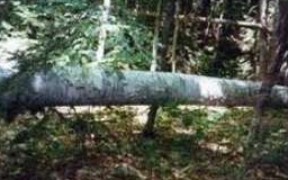
When Kokum finally found a tree she thought might be appropriate - one that not only grew tall but had long ago shed any small branches from its lower trunk - she told us that we had to make sure the bark was good enough before we cut it down. Not all trees provided good canoe bark.
The idea was to cut a piece off and test it. She said the bark should be about one quarter inch thick
and not crack when it was bent or twisted. If it passed the thickness and twisting tests it was good enough to be made into a birch bark canoe.
The tree passed the test but even then my father wasn't allowed to cut it down. First, Kokum talked to the tree and thanked it for providing us with a canoe. My Dad did the same type of thing before he went on a hunt. He thanked the animal ahead of time for providing us with the ability to carry on our own lives. The Ojibwa don't have a word or concept that separates man from his environment. The universe in which we live is alive with the spirit of the Manitou.
We give thanks, and only then can we take a life.
But before the saw was raised we had to clear a place so that the tree could fall without hitting rocks or dead stumps that might have damaged the bark and ultimately have given us a sieve instead of a birchbark canoe.
At the time we had tools with us, but here's how my ancestor's had to fell a tree without an axe or saw.
Peeling the Bark
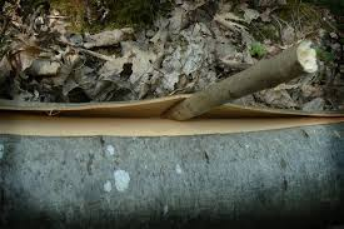
After Dad finally chopped and sawed the tree down, he cut the top away and then Kokum showed us how to peel the bark.
With her hunting knife she scored a shallow straight line that ran from one end of the birch log to the other. Then, straddling the tree she put her axe blade into the score line and with the back end of the hatchet, hammered the blade into the score. She shuffled herself along the log until she'd made a single line of axe cuts from one end of the tree to the other.
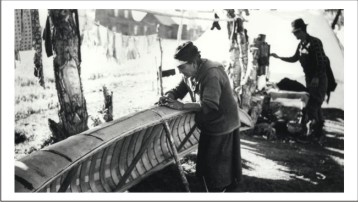
The bark was carefully peeled away from either side of the cut line using a wedge and sometimes the hatchet blade. My parents did this work...after all it was their lesson...but every time they hit a tough spot Kokum would push them away and do it herself so that there was no danger of them cutting a hole in the bark and ruining her birchbark canoe!
It was particularly tricky completing the peel at the bottom side of the log, but Kokum made a couple of small cedar strip boards from deadfall and wedged them between the bark and the log. By tapping the boards with the hatchet the bark was finally loosened.
Time for lunch.
While we ate we learned about a birchbark canoe that Kokum had seen
made when she was a child...that would have been in the 1870's before
the Canadian Pacific Railway was in it's glory. The birch bark canoe she
talked about was a huge forty or fifty foot freight canoe. It was the
type of canoe that needed at least a half dozen men to paddle and was
used to move supplies up and down the waterways. Those freight canoes
used to be so plentiful that no-one thought to preserve an example for
you to admire. There's not even an original freight canoe in the
Canadian Canoe Museum! Kokum told us that it took four large trees to
make that birchbark canoe. Nowadays trees of that size can't be found.
After lunch the log was ever so carefully rolled off the birch bark by using a couple of saplings braced on the cedar strip boards as a lever. Then the huge piece of bark was rolled up end to end and tied with a tump line to be carried home on my father's back.
So...first you chose the tree, then peeled the bark and then it was time to find a shady spot to build the birchbark canoe.
Preparing the Site
Birch bark canoes are best built on a soft spot on the ground and in the shade so that the bark doesn't dry out and become brittle. If you don't have access to a leafy forest site it's a good idea to build a temporary shelter because the bark can't be worked well if it dries out. Canoe shelters used to be made from poles and bark, but I won't laugh if you just string up a tarpaulin.
It's good to have a supply of sand or at least some soft clean dirt close at hand. It can be piled up around the outside of the bark to hold the canoe in place at various stages of the construction process.
You'll also need to build a plywood (or strip wood) frame that must be the same size as the gunwales of your proposed canoe. The frame can be used over and over to build other birch bark canoes so your labour and materials won't go to waste.
If you aren't going to build your canoe beside a lake or river you'll also have to create a system that will allow you to soak the big roll of birch bark. An old bathtub might work depending on the length of the bark, but you could also drape a plastic tarpaulin inside a large wooden crate and fill it with water to create the same effect.
A system of steaming wood is also useful. . .though pouring hot water over the canoe ribs before you attempt to install them is an alternative. Keep in mind that prehistoric canoe makers didn't have access to today's technology yet built birchbark canoes that lasted thirty or forty years.
Now we can move along to a step by step guide to building a birchbark canoe.

Build a Birchbark Canoe - Step by Step Instructions
Basic instructions to guide you on how to build your own canoe.
Canoes, snowshoes and toboggans.
I grew up at a time when everyone had a canoe . . . sometimes more than one.
Indian Canoes - Dugout to Birchbark
A brief outline of the development of First Nations transportation before European's arrived in North America.
|
|
 |
 |