Native-Art-in-Canada has affiliate relationships with some businesses and may receive a commission if readers choose to make a purchase.
- Home
- Maple Syrup
- How to Make Maple Syrup
How to Make Maple Syrup
An Important Ojibwa Food
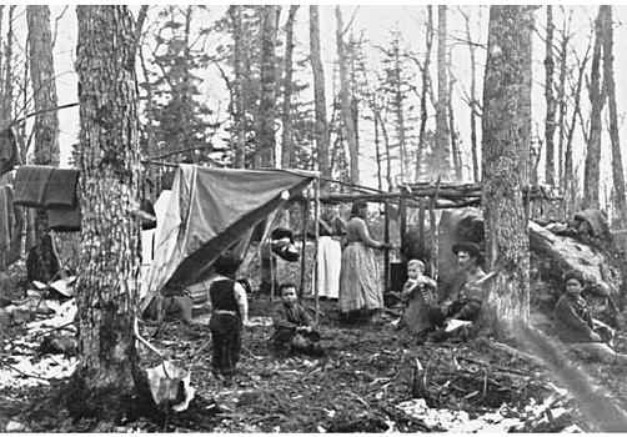
Traditionally every Ojibwa child learned how to make maple syrup because it was a family event. Maple sugar and maple syrup were important parts of the diet and when the sap started to move up the trees, whole families moved to the sugar camps.
Syrup was so important that the fourth moon of the year (late March-April) was called Izhkigamisegi Geezis, the Moon of Boiling. Large amounts were made during the few weeks in Spring when the maple or birch sap moved up the trees.
How to Make Maple Syrup
the Traditional Way

Snow would still be on the ground when families would head to a section of the forest that was traditionally 'theirs' to harvest the sap. They'd carry rolls of birch bark to cover the frames of last years wigwams and, in early years, would also haul in birchbark bowls and baskets to catch the sap. Of course, when they became available from traders, iron kettles were treasured tools of the maple syrup trade.
Work was divided up when the families arrived at the camp. Often a cache of food had been stored at the site the previous fall so young girls were sent off to unearth cedar bark bags of wild rice or dried cranberries sewn up tightly in packets of birch bark known as makuks. Men and boys made the camp habitable and found openings in the ice where they could fish for the evening's supper. The women had their own responsibilities.
How to Make Maple Syrup Tools
 Maple Sap
They made spiles by pushing the pith out of large elderberry or sumac stems, sharpening the stick at one end and notching it to hold the sap basket or pail. The spiles were called negwakwun. They were hammered into the south side of the tree three or four feet from the ground and sealed in with hot pitch from spruce trees.
In the old times when birchbark baskets were used to catch the sap and cook the syrup, older women would scout for tall straight birch trees. The best time to make baskets was in the spring and early summer because the inner layer of bark was wet with sap and could be folded easily at the corners. The bark was sewn together with boiled basswod fibre or the core of the jack pine root.
 Boiling Sap with Hot Rocks
Birch bark doesn't burn easily when thoroughly soaked in water and can withstand being gently heated over...not in...an open flame. Rocks were heat red hot in the fire and dropped into the baskets of sap to heat it to the boiling point. Repetitively adding hot rocks as others cooled down allowed the water in the sap to evaporate until eventually the sap became maple syrup.
Technology changed, of course, and tin cans and jam pails eventually made good containers to catch the sap. But whatever they were made of, the collection pails were called nadoban. It's a verb meaning 'she goes and gets' but in the context of maple syrup it became a noun because 10 to 20 gallons of sap make a single gallon of maple syrup. That was a lot of 'going and getting'!
No one I knew had to endure the drudgery of dropping a multitude of hot rocks into a basket as part of the process of making maple syrup. Iron pots, of course, had been around for a long time by the time I was born. It's a lot easier to set a pot of sap over a fire and tend to the boiling and evaporation than it is to get rocks red hot in a fire and manoevre them into a birchbark basket!
The Nitty Gritty and How to Make Maple Syrup
Of course the boiling sap always had to be tended so that it didn't burn. A wood paddle was used to give an occasional stir and to lift out the nitty gritty bits that found their way into the pot. As the volume of sap evaporated more sap was added and the process continued until the kettle was full of thick maple syrup.
A short cut...not appreciated by the hard core enthusiasts called for pre-freezing the sap. If weather permitted, the collected sap could be left to freeze overnight and the ice removed in the morning. Repeated freezing eventually produced a thicker sap that could be further processed over heat to make syrup.
When the maple syrup was finally ready some of it was stored in it's liquid form, some of it was made into maple sugar.
So much for how to make maple syrup...if you live in a particularly cold part of the world try making birch syrup or harvest the sap from box elder instead.

How to Make Maple Syrup - the Overview
|
|
 |
 |