Native-Art-in-Canada has affiliate relationships with some businesses and may receive a commission if readers choose to make a purchase.
- Home
- Moose Hide Tanning
Moose Hide Tanning
Moose Hide Tanning the Old Fashioned Way
Moose hide tanning is a traditional practice that is so labor-intensive that fewer and fewer people take the time nowadays to do the work. Young people have others ways to make money more effectively, so its almost always elderly men and women who take the time to do the hours of scraping, fleshing and smoking.
Of all the fur bearing animals that live in the northern forests, the moose produces the largest and thickest hide. A bull moose hide is the heaviest and takes the most effort. It's a bit easier to work on a moose cow hide because it softens up faster. But if it's a sturdy pair of moccasins or mukluks you're after, go for the big guy.
Moose hides are very thick in the winter months so spring and summer moose hides are better (easier at any rate) for tanning.
The Hide Tanning Process
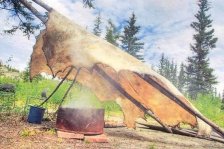
Soak the hide for three days to loosen the flesh and hair, then drape the wet hide over a log or heavy pole. A wet moose hide can easily weigh 50 kilos (110 pounds) so look around for a little help if you need it. Scrape the bulk of the flesh and hair off while the hide is wet and easy to work with.
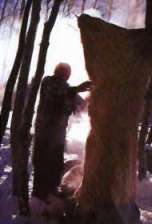
Once the hide is reasonably clean make holes along the outside edge of the hide, use them to tie the hide to a large pole stretcher where you can leave it to dry out for a few days.
When its dry the softening process can start but remember that nobody said that moose hide tanning was easy.
With both hands, scrape a fleshing tool across the flesh side of the hide in hard downward strokes. This is hard work that usually takes two full days. When done, turn the hide over and using a smooth board or a paddle scrape the hair side to remove the hair and also the hair follicles. Don't stop until the hide is a very even thickness...if its a cow moose this might be about 1/8" but it can be 1/4" if its a big bull. Just remember that the more you scrape and work and scrape and work, the softer the hide will become.
Next remove the hide from the frame and rinse it to remove all the blood. Rinse THOROUGHLY and then it wring out the water. If you don't have a handy dandy moose hide tanning wringer available you'll have to find somebody to help because the hide is too heavy for one person to do it effectively. When finally damp, hang it over the frame to dry again.
The Pre-Smoking Stage of Hide Tanning
Now Comes the Hard Part
Traditionally at this point the hide is soaked again in water, wrung damp dry. Then the hide is thoroughly massaged with a solution of cooked brain mashed in water. Brain is used because it has just the right amount of fat in it to soften the hide and in combination with the scraping alter the protein structure of the skin so that it can never again return to its rawhide state.
There's a saying, "Every animal has just enough brains to preserve its own hide - dead or alive." But hunters who cheat sometimes use a solution of soap and fat nowadays. What's the world coming to?
The brain emolient must be massaged into the hide, soaked again, stretched again, scraped and scraped and scraped again then turned over and massaged with emolient on the other side and the process repeated.
But thats' not all...the brain massage, smoking, soaking and stretching process is repeated (and if necessary repeated again) until the moose hide is soft, felt like and fuzzy.
You're Almost Done - The Final Smoke
In one sense, the process of moose hide tanning is complete at this point. You can actually stop here if you want, but the problem is that if the hide gets wet you're going to have to do that brain massage, stretch and scrape bit again. The hide at this stage is a creamy colour and is often used for ceremonial regalia. But taking it to the next step is more practical. To ensure that the hide can get wet and remain supple, its necessary to permeate the hide with smoke...not just a light smoke like last time.
Moose Hide Tanning - The Last Bit
To smoke-tan a hide you will have to use hot coals that will produce only smoke and no flame. Punky wood is good for this. Rotten spruce wood gives a nice golden color but if you want a reddish tinge add some dry cones (just don't let them flame up when the hide is in place!).
At this point the sides of the hide are sewn together and an old canvas or heavy piece of cloth is sewn to the bottom of the hide to make a skirt. Heavy twine is threaded through the holes at the top of the hide and used to hold the hide above the coals. The skirt is positioned so that it surrounds the coals without itself getting burnt and the hide/skirt combination provides an airtight structure around the smoking fire. Keep the cone fanned out so that there are no wrinkled places that won't accept the smoke. When the smoke appears to have penetrated to the outside of the hide take it down, turn it inside out and then repeat the process.
Expect to smoke the hide for at least four or five hours to achieve a nice even colour and create the conditions that will allow it to get wet in the future without drying up. When the desired shade is achieved the hide is taken down, the skirt removed but the hide then rolled up and left overnight for more smoke to be absorbed. In the morning the hide is unstitched and hung outside to release the smoke.

|
|
 |
 |